Image Source: dam.thdstatic.com
How To Set Up A Basketball Hoop: Easy Step-by-Step Guide
Setting up a basketball hoop is a fantastic way to bring the thrill of the game right to your driveway or backyard, creating endless hours of fun for family and friends. Can you set up a basketball hoop yourself? Yes, absolutely! With the right tools and a bit of patience, most basketball hoop setups are achievable for a dedicated DIYer. This guide will walk you through the entire process, from choosing the right hoop to the final tightening of the last bolt. We’ll cover everything you need to know for successful basketball hoop installation, whether you’re dealing with a portable basketball hoop setup or the more involved in-ground basketball hoop assembly.
Choosing Your Basketball Hoop: What to Consider
Before you even think about digging or assembling, selecting the right type of basketball hoop is crucial. This decision will impact the complexity of your setup and the longevity of your backyard basketball setup.
Types of Basketball Hoops:
- Portable Basketball Hoops: These are the most popular choice for casual play due to their ease of setup and mobility. They typically have a base that can be filled with water or sand for stability. This makes portable basketball hoop setup relatively straightforward.
- In-Ground Basketball Hoops: These offer superior stability and a more professional feel. They require digging a hole and cementing the pole into the ground, making in-ground basketball hoop assembly a more significant undertaking.
- Wall-Mounted Basketball Hoops: These are mounted directly to a wall, often a garage or house. They save space but require a sturdy wall for secure mounting.
- Adjustable Basketball Hoops: Many portable and in-ground systems offer adjustability, allowing you to change the basketball hoop goal height. This is especially beneficial if younger players will be using the hoop.
Key Factors for Selection:
- Space: How much space do you have available? A full-sized court needs ample room, while a driveway might be more limited. Consider the outdoor basketball hoop placement carefully to ensure safe play.
- Budget: Prices can range from a few hundred dollars for a basic portable hoop to several thousand for a high-end in-ground system.
- Durability: What materials are the hoop, backboard, and pole made from? Look for weather-resistant materials for outdoor use.
- Adjustability: Do you need an adjustable basketball hoop to accommodate different skill levels or ages?
- Portability vs. Permanence: Do you want the flexibility to move the hoop, or are you looking for a permanent fixture?
Preparing for Installation: Tools and Materials
Having the right tools on hand before you start will make the entire process smoother and safer. What tools do I need to set up a basketball hoop? Generally, you’ll need basic hand tools, possibly some power tools, and safety equipment.
Essential Tools:
- Wrench Set: For tightening bolts and nuts.
- Socket Set: Often used with a ratchet for faster tightening.
- Screwdriver Set: For any screw-based fastenings.
- Level: Crucial for ensuring the pole is perfectly vertical.
- Measuring Tape: For accurate placement and height adjustments.
- Shovel or Post Hole Digger: Essential for in-ground basketball hoop assembly.
- Wheelbarrow: For mixing and transporting concrete if needed.
- Drill and Drill Bits: May be required for some mounting or assembly steps.
- Safety Glasses: Always wear eye protection when working with tools or concrete.
- Work Gloves: To protect your hands.
- Ladder: For higher adjustments or mounting.
Materials (Depending on Hoop Type):
- Concrete Mix: For securing in-ground poles.
- Gravel: For drainage in the post hole.
- Water: For mixing concrete.
- Sand: For filling portable bases.
- Anchor Kit (for portable hoops): Some portable hoops may come with an optional basketball hoop anchor kit for added stability.
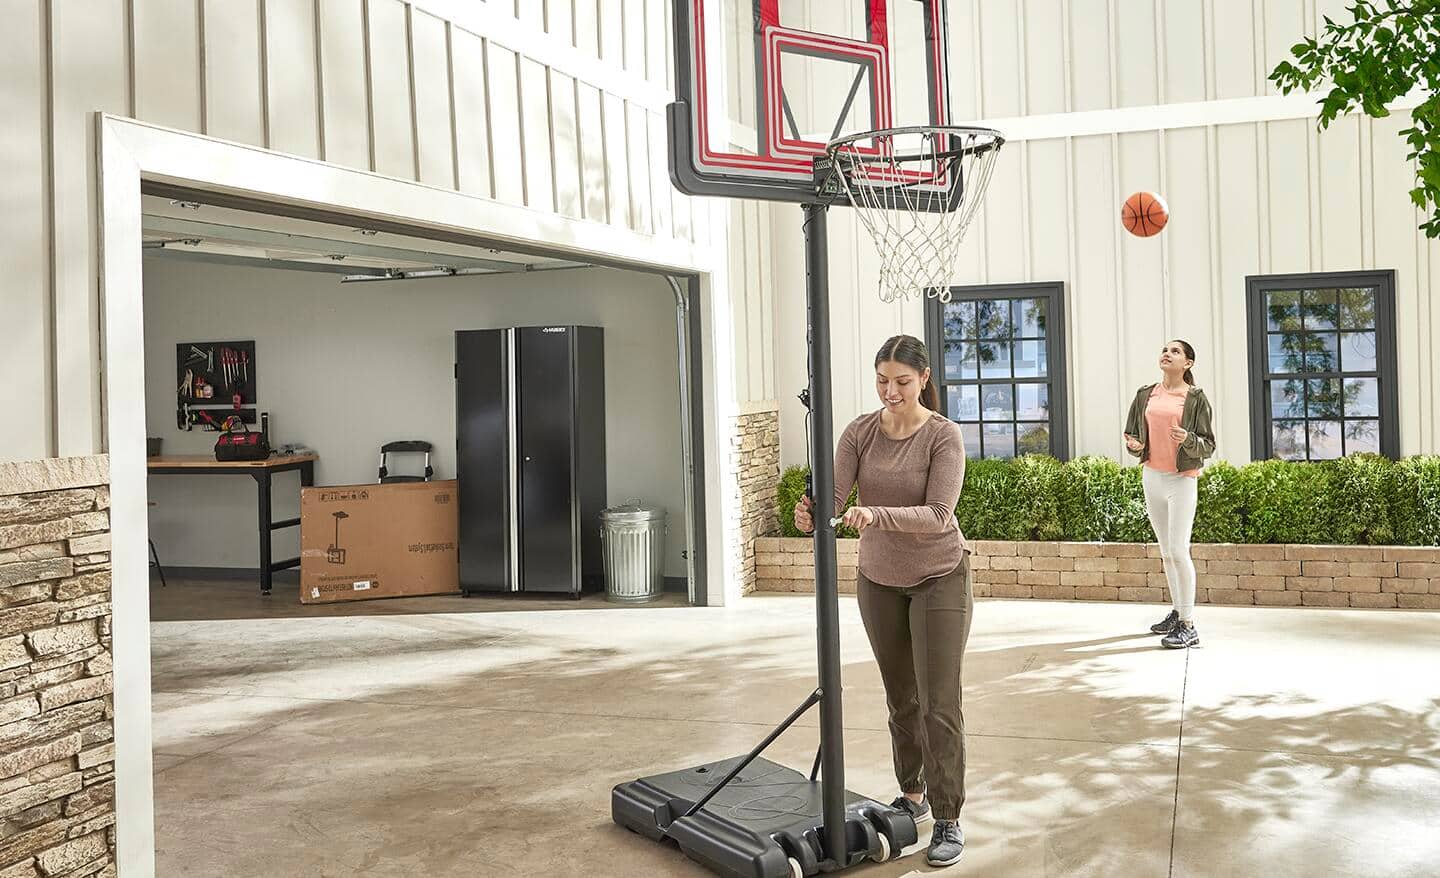
Setting Up a Portable Basketball Hoop: A Step-by-Step Approach
Portable basketball hoop setup is generally less demanding than in-ground systems. Here’s a typical breakdown of the process:
Step 1: Unpacking and Identifying Parts
Carefully unpack all components and lay them out. Compare them against the parts list in your manual to ensure everything is present and undamaged. Familiarize yourself with each piece: the base, pole sections, backboard, rim, and hardware.
Step 2: Assembling the Base
- Many portable hoops have a hollow base that needs to be filled.
- Locate the fill cap or opening.
- You can fill it with water or sand. Sand provides more weight and stability, especially in windy areas, but is heavier to move.
- Fill the base gradually, ensuring an even distribution. Follow the manufacturer’s instructions for the recommended fill level.
Step 3: Assembling the Pole
- Portable hoops often consist of multiple pole sections that slide or bolt together.
- Follow the order specified in your manual, usually starting with the lowest section that attaches to the base.
- Use the provided bolts, nuts, and washers. Hand-tighten them initially.
Step 4: Mounting the Backboard
- This step can be tricky and often requires a second person to help hold the backboard steady.
- Align the backboard with the mounting bracket on the top of the pole.
- Insert the bolts through the backboard and bracket.
- Attach washers and nuts. Again, hand-tighten only at this stage.
Step 5: Attaching the Rim
- The rim attaches to the front of the backboard.
- Ensure you have the correct hardware (usually bolts, washers, and nuts).
- Align the rim with the pre-drilled holes on the backboard.
- Insert the bolts from the back of the backboard through the rim.
- Secure with washers and nuts.
Step 6: Final Adjustments and Tightening
- Once everything is loosely assembled, you can begin tightening.
- Use your wrench and socket set to securely fasten all bolts and nuts. Do not overtighten, as this can strip threads or damage components.
- If your hoop is adjustable basketball hoop, now is the time to set the initial basketball hoop goal height. Consult your manual for the specific adjustment mechanism. This usually involves loosening a pin or bolt, sliding the pole to the desired height, and re-securing.
- Ensure the backboard and rim are level using your level. Make minor adjustments as needed.
- If your portable hoop came with an basketball hoop anchor kit, consider installing it for maximum stability. This typically involves straps and ground stakes that secure the base to the ground.
Step 7: Positioning the Hoop
- Choose your outdoor basketball hoop placement. Consider the playing area, any potential obstructions (trees, fences), and sun exposure.
- Ensure there is adequate space around the hoop for safe play.
- You might need assistance to move the filled portable hoop to its final position.
Assembling an In-Ground Basketball Hoop: A Detailed Guide
In-ground basketball hoop assembly requires more effort and planning, primarily due to the need to dig and set the pole in concrete.
Step 1: Selecting the Location
- Choose a flat, level area for your backyard basketball setup.
- Consider the size of the playing area you envision.
- Check for underground utilities (water lines, gas lines, electrical cables) before digging. Contact your local utility company for a mark-out.
- Think about drainage. You don’t want water pooling around the base.
- Ensure safe clearance from roads, driveways, and fences.
Step 2: Digging the Hole
- The size of the hole is critical for stability. Refer to your manual for specific dimensions. Typically, a hole around 2-3 feet deep and 1-2 feet in diameter is recommended.
- Use a shovel or post hole digger.
- Dig the hole to the specified depth. Ensure the sides are as vertical as possible.
Step 3: Preparing the Hole
- Add a few inches of gravel to the bottom of the hole for drainage. This is crucial to prevent the concrete from cracking in freeze-thaw cycles.
- Place the anchor system or the base plate of the pole into the hole. Ensure it’s centered and at the correct depth. Many in-ground systems use an anchor kit where the pole attaches to a base plate that is then cemented in.
Step 4: Setting the Pole
- This is a two-person job.
- Carefully lower the pole into the hole, aligning it with the anchor system or base plate.
- Use your level to ensure the pole is perfectly vertical in all directions. Shim with small rocks or pieces of wood if necessary to keep it plumb while the concrete sets.
Step 5: Mixing and Pouring Concrete
- Follow the instructions on your concrete mix bag precisely regarding water ratios. Too much or too little water will weaken the concrete.
- Mix the concrete thoroughly in a wheelbarrow. Aim for a consistent, thick batter-like consistency.
- Pour the concrete into the hole around the pole and anchor system.
- Work the concrete with a stick or trowel to remove air pockets. This is important for a solid foundation.
- Fill the hole with concrete, ensuring it’s slightly crowned at the top to direct water away from the base.
Step 6: Curing the Concrete
- This is a vital step that many people rush. Concrete needs time to cure and gain strength.
- Allow the concrete to cure for at least 48-72 hours, or as recommended by the concrete manufacturer.
- During this time, keep the concrete moist by covering it with plastic sheeting or lightly misting it periodically. This helps it cure more effectively.
- Do not place any weight or stress on the pole during the curing process.
Step 7: Attaching the Backboard and Rim
- Once the concrete has fully cured, you can attach the backboard and rim.
- Follow the basketball hoop backboard mounting instructions provided with your specific model. This typically involves bolts, washers, and nuts.
- A second person is highly recommended for holding the backboard.
- Ensure the backboard is level before fully tightening.
Step 8: Setting the Height and Final Touches
- If you have an adjustable basketball hoop, set your desired basketball hoop goal height now.
- Attach the rim to the backboard.
- Securely tighten all bolts and nuts.
- Add any desired accessories, such as pole pads for safety.
Wall-Mounted Basketball Hoops: A Different Approach
Wall-mounted basketball hoop installation requires a strong, suitable wall.
Step 1: Assess the Wall Strength
- Ensure the wall (typically a garage or exterior wall) is made of solid material like brick, concrete, or reinforced wood.
- If mounting to wood studs, ensure you locate and use the studs for maximum support.
Step 2: Mark the Mounting Points
- Determine the desired basketball hoop goal height.
- Use a stud finder if mounting to a wood-framed wall.
- Mark the exact locations for your mounting brackets according to the manufacturer’s instructions and your desired height. Use a level to ensure the brackets are perfectly aligned horizontally.
Step 3: Drill Pilot Holes
- Drill pilot holes at your marked locations. The drill bit size should be appropriate for the lag bolts or anchors you will be using.
Step 4: Secure the Mounting Brackets
- Attach the mounting brackets to the wall using the provided lag bolts or heavy-duty anchors.
- Ensure the brackets are flush against the wall and extremely secure.
Step 5: Attach the Backboard and Rim
- Mount the backboard to the brackets according to the specific instructions for your hoop. This usually involves bolts that go through the backboard and into the brackets.
- Attach the rim to the backboard.
- Tighten all hardware securely.
Maintaining Your Basketball Hoop
Proper maintenance will ensure your basketball hoop lasts for years to come and remains safe for play.
- Regularly check for loose bolts and nuts: Especially after windy days or heavy play. Tighten as needed.
- Inspect the backboard and rim: Look for cracks or damage, particularly in the rim or where the rim attaches to the backboard.
- Check the pole: Ensure it remains vertical and secure, especially for in-ground systems.
- Clean the backboard and rim: Use mild soap and water for cleaning. Avoid abrasive cleaners that can scratch the surface.
- Protect from extreme weather: In areas with harsh winters, consider taking down the backboard and rim or covering them to protect them from snow and ice.
- For portable hoops: Ensure the base remains filled to the correct level. If using water, you may need to add a small amount of antifreeze in freezing climates to prevent the water from expanding and cracking the base.
Frequently Asked Questions (FAQ)
Q1: How deep should I dig the hole for an in-ground basketball hoop?
A1: Typically, a hole between 2 to 3 feet deep is recommended for in-ground basketball hoop assembly. Always refer to your specific hoop’s manual, as dimensions can vary based on the pole thickness and desired stability. Adding a few inches of gravel at the bottom for drainage is also crucial.
Q2: Can I set up a basketball hoop on a slope?
A2: It is highly recommended to set up your basketball hoop on a flat, level surface. A slope can make basketball hoop installation difficult, compromise stability, and create an uneven playing field, which is unsafe. If you must use a sloped area, you’ll need to excavate and build up a level pad for the hoop.
Q3: How long does concrete take to cure?
A3: Concrete typically takes 48 to 72 hours to cure sufficiently to bear weight. However, it continues to gain strength for weeks. It’s best to avoid putting any stress on the basketball hoop pole installation for at least 72 hours.
Q4: What is the standard basketball hoop goal height?
A4: The official basketball hoop goal height for professional and collegiate play is 10 feet (3.05 meters) from the floor to the rim. Many adjustable basketball hoop systems allow for this height, as well as lower heights for younger players.
Q5: How do I make my portable basketball hoop more stable?
A5: For a portable basketball hoop setup, stability is achieved by filling the base with enough weight (sand is heavier and more stable than water) and ensuring the base is on a level surface. Using an basketball hoop anchor kit can also provide significant additional stability, especially in windy conditions.
Q6: Do I need a permit to install an in-ground basketball hoop?
A6: In some municipalities, installing a permanent structure like an in-ground basketball hoop may require a permit. It’s always best to check with your local building department before starting in-ground basketball hoop assembly to avoid any potential issues.
Q7: What is the best way to move a filled portable basketball hoop?
A7: Most portable hoops have wheels on the base. To move a filled hoop, tilt it back slightly onto its wheels and then push or pull it. For very heavy bases filled with sand, you might need assistance.
Q8: How do I adjust the height of an adjustable basketball hoop?
A8: Most adjustable basketball hoop systems use a pin and hole mechanism or a crank system. For pin systems, you typically loosen a bolt, remove a pin, slide the telescoping pole to the desired height, reinsert the pin, and retighten the bolt. Crank systems involve turning a crank handle to raise or lower the pole. Always refer to your specific model’s manual.
By following these detailed steps, you can confidently set up your basketball hoop and create your very own backyard basketball setup, ready for countless games and memorable moments. Enjoy the game!