Painting lines on a basketball court is a big job. It needs careful work and the right tools. A sports court line striper helps make lines straight and neat. Yes, you can paint outdoor basketball court lines yourself, but it takes time and patience. This guide will show you how to do it step-by-step. You will learn about basketball court dimensions, how to pick court line marking paint, and much more.
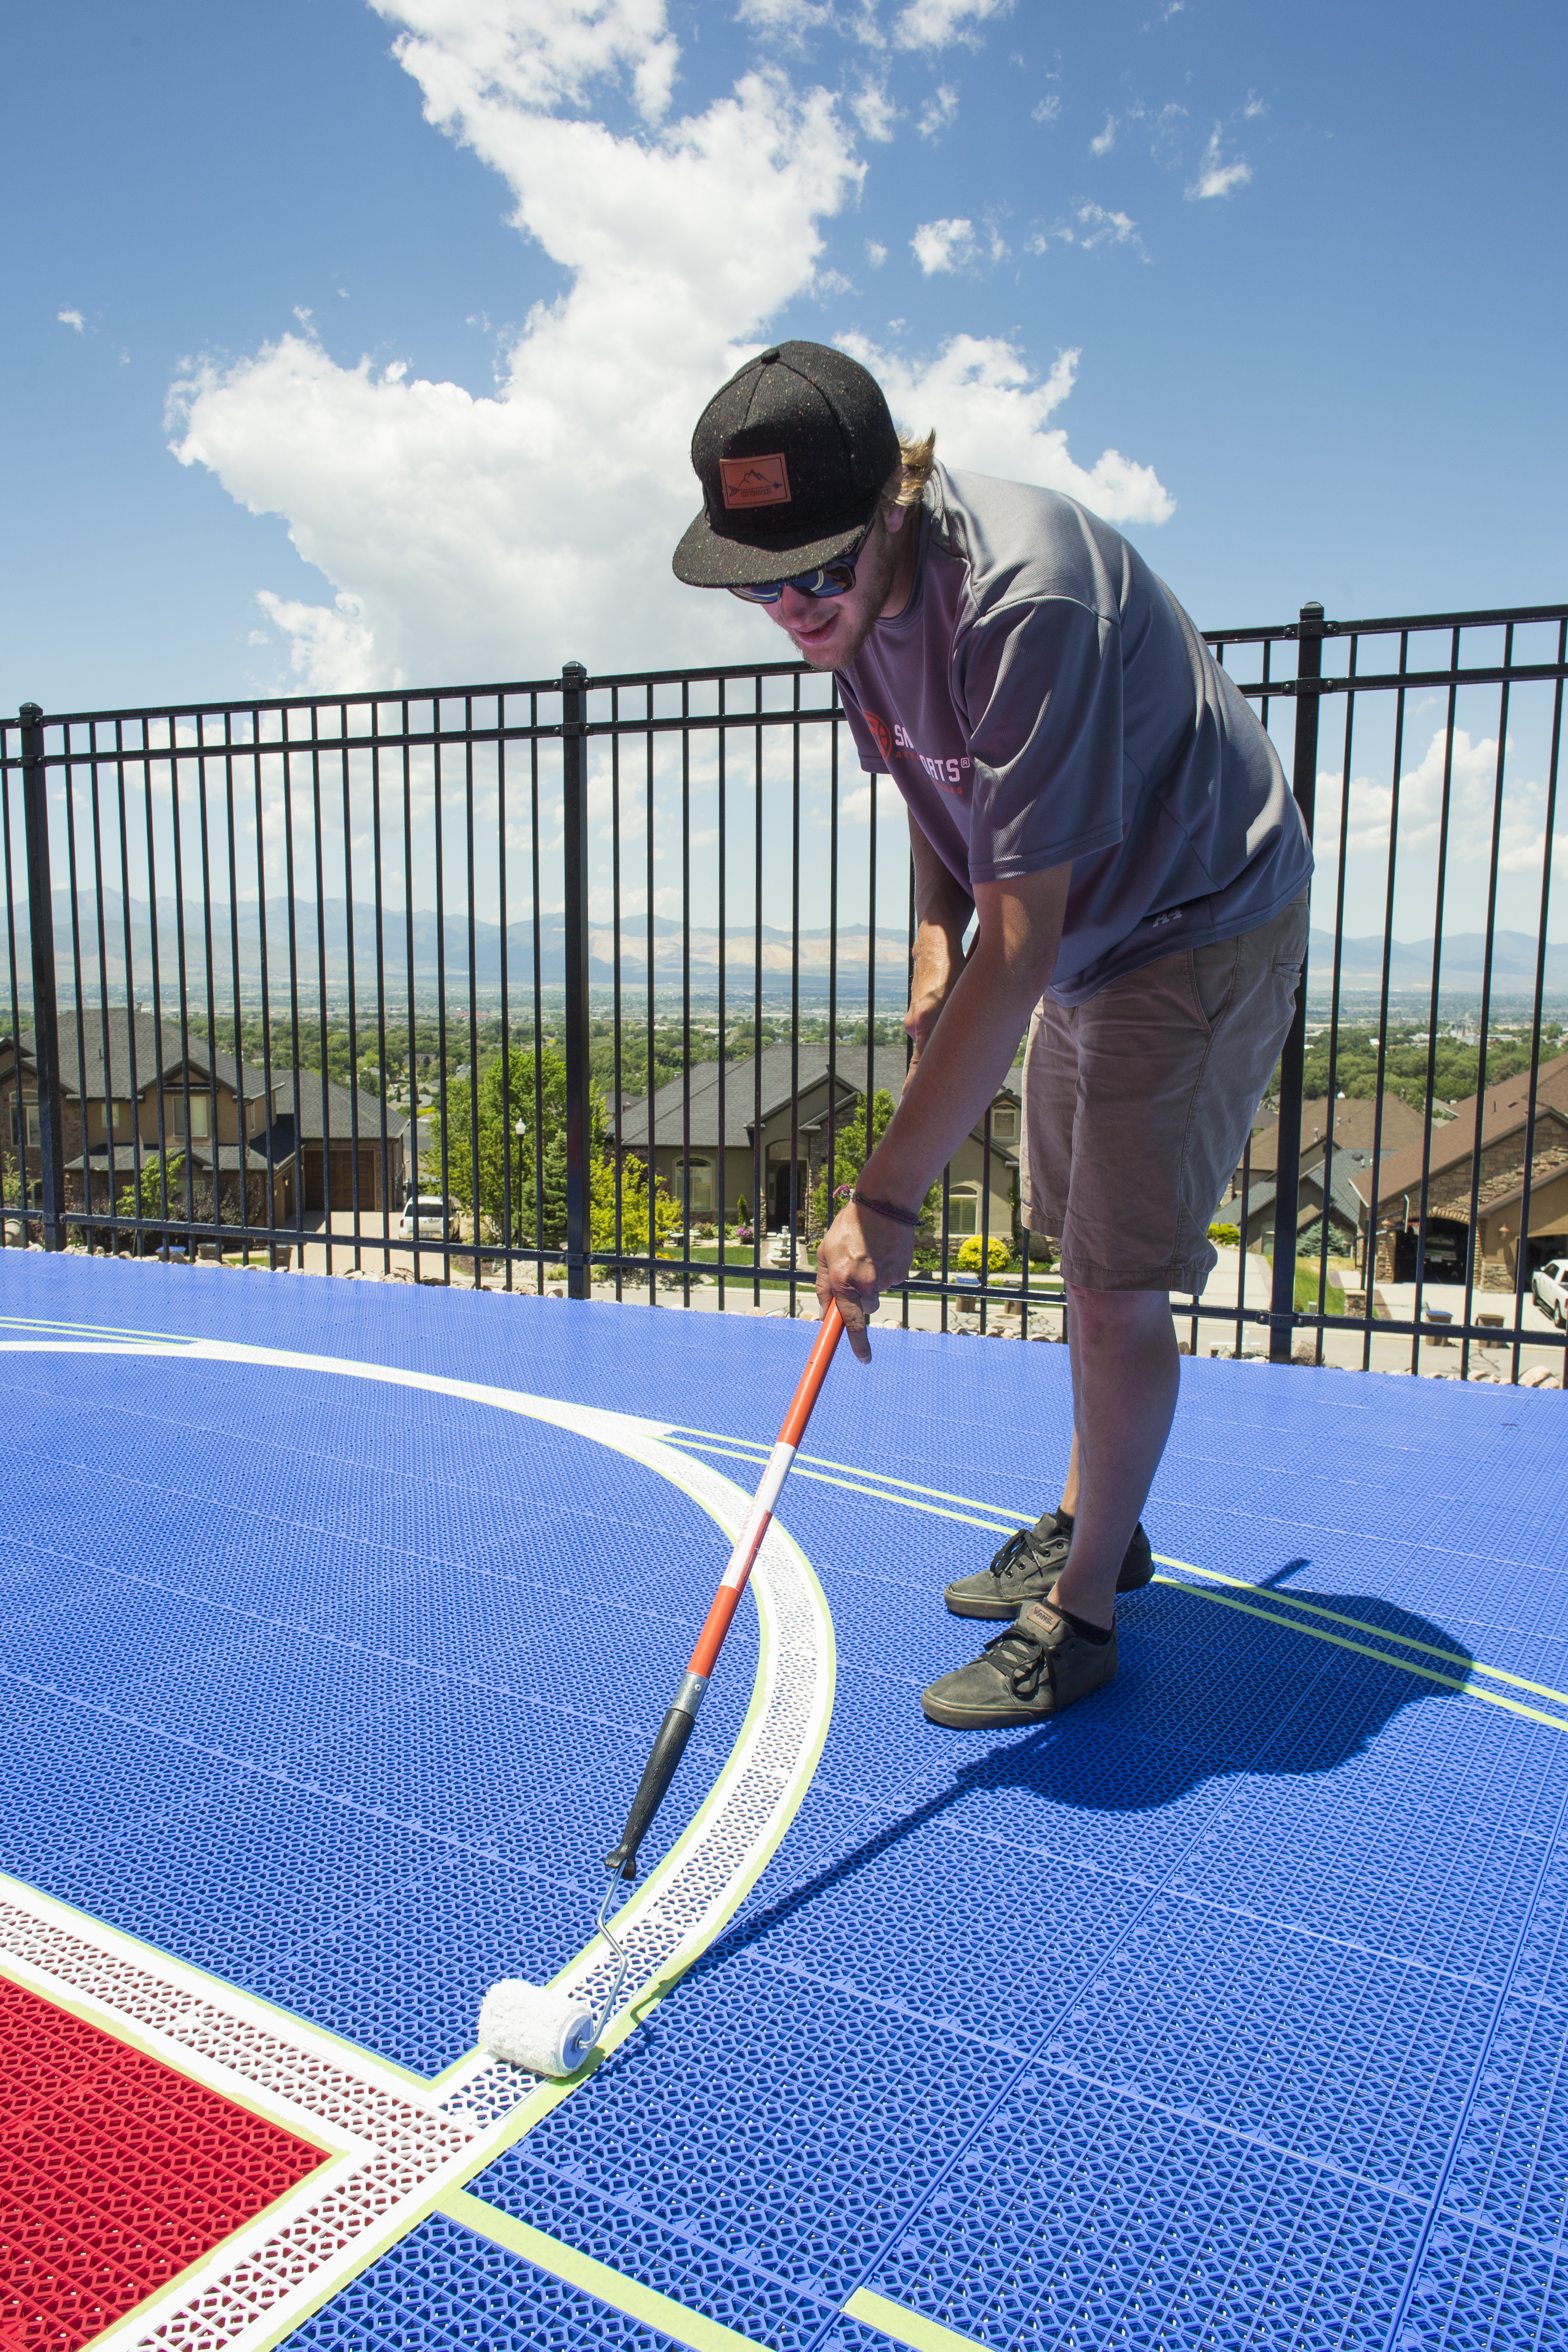
Image Source: www.snapsports.com
Preparing for Success: Tools and Space
Before you start painting, you need to get ready. This means choosing the right spot, making sure the court is clean, and gathering all your supplies. Proper preparation makes the job easier and the lines look better.
Choosing the Right Location
Think about where your court will go.
* Flat Ground: The surface must be very flat. Bumps and dips will make painting hard. They can also make the ball bounce wrongly.
* Good Drainage: If your court is outside, water must drain away. You do not want puddles on your court. This can ruin the paint. It can also make the court unsafe.
* Enough Room: A full basketball court diagram shows you need a lot of space. Make sure you have extra room around the court lines. This makes play safe. It also helps if the ball goes out of bounds.
Getting Your Tools Ready
You need specific tools to paint straight, clear lines.
* Measuring Tape: Get a long one, at least 100 feet. This helps measure basketball court dimensions.
* Chalk Line Reel: This makes straight lines easily. It uses chalk powder.
* Painter’s Tape: Get a lot of strong painter’s tape. This helps make crisp edges for your lines. It stops paint from going where you do not want it.
* Sports Court Line Striper: This tool is a must-have. It puts paint down in an even, straight line. You can rent one or buy one. It saves a lot of time and makes the job look professional.
* Paint Rollers or Brushes: Use these for bigger areas or touch-ups.
* Cleaning Supplies: Brooms, leaf blowers, power washers. These help clean the surface.
* Safety Gear: Gloves, eye protection, old clothes. Protect yourself from paint and dust.
Picking the Right Paint
The type of paint matters a lot, especially for outdoor basketball court lines.
* Court Line Marking Paint: This paint is made for sports courts. It is tough and lasts a long time.
* Acrylic Line Marking Paint: This is often the best choice. Acrylic paint handles weather well. It resists fading from the sun. It also stands up to heavy use. It dries fast too.
* Color: Most courts use white lines. White stands out on dark or light surfaces. You might use other colors for special marks, like a three-point line. Always choose a color that clearly shows up on your court surface.
Preparing the Court Surface
This step is very important. Clean ground helps the paint stick well.
* Sweep and Clean: First, sweep away all dirt, leaves, and loose bits. Use a broom or a leaf blower.
* Wash the Surface: If the court is dirty, wash it. A power washer works best. Use a mild cleaner if needed. Rinse it very well. Make sure no soap is left.
* Let It Dry Completely: The court must be bone dry before you paint. If it is wet, the paint will not stick. It might also peel off later. Give it at least 24 hours to dry. More time is better if the air is humid.
* Fix Cracks and Holes: Small cracks can be filled with a special repair product. For big cracks, you might need expert help. Paint will not look good over cracks. It will also wear out faster. Make sure the repair material is dry and smooth before painting. This is key for concrete court line painting.
Laying Out the Court: Measuring and Marking
This is the most important part for getting accurate lines. Precision is key. You will be making the official basketball court diagram come to life.
Getting the Main Measurements Right
An official basketball court has set sizes. These sizes are the same everywhere. It is vital to get these numbers right.
- Court Length: A full court is 94 feet long.
- Court Width: A full court is 50 feet wide.
These are the outer edges of the playing area.
Table: Key Basketball Court Dimensions
| Feature | Measurement (Feet) | Measurement (Meters) | Notes |
|---|---|---|---|
| Full Court Length | 94 | 28.65 | From baseline to baseline |
| Full Court Width | 50 | 15.24 | From sideline to sideline |
| Foul Line | 15 | 4.57 | From free-throw line to backboard |
| Three-Point Line | Varies | Varies | NBA: 23’9″; College: 22’1.75″; HS: 19’9″ |
| Lane Width | 12 | 3.66 | Width of the key (foul lane) |
| Basket Height | 10 | 3.05 | From floor to rim |
| Half-Court Line | 47 | 14.33 | Center of the court |
| Restricted Area Arc | 4 | 1.22 | Under the basket (charging calls) |
For basketball court dimensions, always double-check your numbers. Use an official basketball court diagram as your guide.
Beginning with the Baselines and Sidelines
These are the first lines you will mark. They form the basic box of the court.
- Mark Your First Corner: Pick a corner to start. Put a small mark there. This will be Corner A.
- Measure the Length: From Corner A, measure 94 feet in a straight line. This is your first sideline. Mark the end point. This is Corner B. Use your long tape measure.
- Measure the Width (Approximate): From Corner A, measure 50 feet out. This will be the start of your baseline. Mark this point. This is Corner C.
- Square the Court: This is very important. To make sure your court is a perfect rectangle, use the 3-4-5 rule or measure the diagonals.
- 3-4-5 Rule: From Corner A, measure 30 feet along the sideline (towards B). Mark it. From Corner A, measure 40 feet along the baseline (towards C). Mark it. The distance between these two marks should be exactly 50 feet. Adjust Corner C until it is.
- Diagonal Check: Measure from Corner A to the opposite corner (Corner D). Then measure from Corner B to Corner C. These two diagonal measurements must be exactly the same. For a 94×50 court, the diagonal is about 106.9 feet. Adjust your corners until both diagonals match.
- Mark All Corners: Once your first three points are perfect, measure to find the fourth corner (Corner D). Then re-check all diagonals.
- Chalk Line for Outer Box: Once the four corners are set, use your chalk line reel. Snap chalk lines between the corners. These are your
outdoor basketball court linesfor the main box.
Marking the Center Court
This is a key area of the court.
- Find Half-Court: Measure 47 feet from each baseline towards the center. Connect these two points with a chalk line. This is the half-court line.
- Center Circle: Find the middle of the half-court line. This is the exact center of the court. From this point, measure out a radius of 6 feet. Draw a circle using a string and a pencil or chalk.
- Restraining Circles: There are also two smaller circles outside the center circle. These have a radius of 2 feet. They are 4 feet from the center circle on each side of the half-court line. Mark these.
Placing the Foul Lines and Key
This is where precise basketball court foul line dimensions come in. The foul lane is also called the “key”.
- Foul Line Distance: The
basketball court foul line dimensionsstate that the foul line is 15 feet from the backboard. However, on the court diagram, this 15 feet is usually measured from the front of the baseline to the front of the foul line. - Key Width: The foul lane (key) is 12 feet wide.
- How to Mark the Key:
- From the center of each baseline, measure 15 feet out towards half-court. Mark these points. These are the centers of your foul lines.
- From these center marks, measure 6 feet to each side (making the total 12 feet wide). Mark these points.
- Connect these points to form the foul line.
- Then, from the ends of the foul line, draw lines straight back to the baseline. These are the sides of the key.
- You now have a 12-foot wide box extending 15 feet from the baseline.
Adding the Free Throw Circles and Restricted Area
These are smaller but important marks.
- Free Throw Circle: At the top of each foul line, there is a circle. The top half of this circle extends into the court. The bottom half is inside the key. The center of this circle is the midpoint of the foul line. It has a radius of 6 feet. You will draw only the half-circle that points away from the basket.
- Restricted Area Arc: Underneath each basket, there is a small arc. It has a radius of 4 feet from the center of the basket. This arc marks the “restricted area.” Players cannot take a charging foul in this area. Draw this arc.
Marking the Three-Point Lines
The three-point line distance depends on who will play on the court. Check your official basketball court diagram for the exact distance.
- NBA Court: 23 feet, 9 inches (23’9″) from the center of the basket.
- College/WNBA Court: 22 feet, 1.75 inches (22’1.75″) from the center of the basket.
- High School Court: 19 feet, 9 inches (19’9″) from the center of the basket.
How to Mark:
1. Place your tape measure or string at the exact center of the basket.
2. Swing an arc from one sideline to the other. Make sure the arc is always the correct distance from the basket.
3. The three-point line then runs straight and parallel to the sideline until it meets the arc.
4. Repeat for the other side of the court.
Final Checks for How to Measure Court Lines
Before you tape and paint, double-check everything.
* Walk the entire court.
* Look at all chalk lines. Do they look straight?
* Measure key distances again.
* Compare your layout to an official basketball court diagram. This is your last chance to fix mistakes.
Painting the Lines: Color and Precision
Now for the fun part: putting down the paint! This step needs a steady hand and patience.
Taping the Lines
This step makes your lines sharp and clean.
* Use Good Tape: Use high-quality painter’s tape. Cheap tape can let paint bleed under.
* Tape on the Outside: Place the tape on the outside of your chalk lines. This way, your painted line will be the exact width of the chalk line.
* Press Down Firmly: Press the tape down very hard. Make sure it sticks well to the court. No gaps. This stops paint from getting under the tape. This is vital for concrete court line painting.
* Curves and Circles: For curves, use flexible painter’s tape. Or, use smaller pieces of regular tape, overlapping them slightly. Take your time here.
Applying the Paint
This is where your sports court line striper comes in handy.
* Mix the Paint: Stir your acrylic line marking paint well. Follow the directions on the can.
* Load the Striper: Fill your sports court line striper with paint. Make sure the nozzle is clean.
* Test Strip: Find a scrap piece of cardboard or concrete. Do a test strip. This helps you get the feel of the striper. Adjust the nozzle for the right line width. Most lines are 2 inches wide.
* Paint Straight Lines: Walk slowly and steadily. Keep the striper moving at an even pace. Overlap slightly on edges if needed. Paint one line at a time.
* Paint Curves and Circles: For circles, you might need to use a small roller or brush. It is hard to use a striper on tight curves. Paint carefully inside your taped area.
* Multiple Coats: For best results, apply two thin coats of court line marking paint. Let the first coat dry fully before adding the second. This makes the lines brighter and last longer. Check the paint can for drying times.
Removing the Tape
This part is exciting, as you see the crisp lines.
* Timing is Key: Remove the tape when the paint is still slightly wet, but not runny. If you wait too long, the paint might stick to the tape. It could peel off with the tape. If it’s too wet, it might smear.
* Pull Slowly and Evenly: Pull the tape off at a sharp angle, away from the painted line. Pull it slowly and smoothly. Do not yank it.
Drying and Protecting: Finishing Up
Your lines are painted! Now you need to let them dry and protect them.
Curing Time for Paint
- Patience is a Virtue:
Acrylic line marking paintdries fast to the touch. But it needs more time to fully harden. This is called “curing.” - Check the Can: The paint can will tell you how long to wait before walking on the lines. It will also tell you how long until the court can be used for play. This could be 24-72 hours or more.
- Protect from Elements: If your court is
outdoor basketball court lines, check the weather. Avoid rain or very cold temps during drying. Cover the painted lines if rain is coming.
Adding a Protective Sealant (Optional but Recommended)
A sealant can make your lines last even longer.
* Why Seal? A sealant adds a clear layer of protection. It makes the lines tougher. It helps them resist wear from shoes, sun, and weather. This is extra helpful for outdoor basketball court lines on concrete court line painting.
* Type of Sealant: Use a clear acrylic or polyurethane sealant. Make sure it is safe for sports courts.
* How to Apply: Apply it after the paint is fully cured. Follow the product’s directions. You might use a roller or sprayer. Apply thin, even coats.
Keeping Lines Sharp: Maintenance Tips
Your new court lines look great! To keep them that way, follow these simple care tips.
Regular Cleaning
- Sweep Often: Dirt and dust can make lines look dull. Sweep the court often with a broom or leaf blower.
- Wash as Needed: If lines get very dirty, wash them. Use a mild soap and water. A soft brush can help. Rinse well.
- Avoid Harsh Cleaners: Do not use strong chemicals. They can harm the paint.
Watching for Wear and Tear
- Check Lines: Look at your lines regularly. Do they look faded? Are they chipping?
- Touch-Ups: Small chips or faded spots can be touched up. Use the same
court line marking paintyou used before. Tape around the area. Paint carefully. - Repainting: Over many years, the lines will fade. You will need to repaint the whole court. This is less work than the first time. You already have the lines as a guide.
Special Care for Outdoor Courts
Outdoor basketball court lines face more challenges.
* Sun Protection: Sunlight can fade paint. A good sealant helps.
* Weather Effects: Rain, snow, and ice can harm lines. Clear away snow and ice gently. Do not use metal shovels on the lines.
* Cracks: Keep an eye out for new cracks. Fill them quickly. This stops water from getting under the court.
Gymnasium Court Line Layout: Indoor Court Differences
Painting lines in a gymnasium court line layout is similar but has some key differences.
Surface Type
- Wood Floors: Gyms often have wooden floors. You must use special paint for wood. This paint is usually more flexible. It also must be safe for wood and not slippery.
- Cleanliness: Indoor courts are usually cleaner than outdoor ones. Still, sweep and mop thoroughly.
- No Weather Issues: You do not worry about rain or sun fading the paint. But temperature and humidity inside can still affect drying times.
Paint Choice
- Specific Indoor Paint: Always buy
court line marking paintmade for indoor use. It will be marked for gymnasium floors. It often has properties like low odor and quick drying. - Clear Coating: Indoor courts almost always get a clear finish over the entire floor. This protects the lines and the wood. Lines are often painted under this clear finish. This makes the lines last much longer. If painting over an existing finish, you might need to sand the area first.
Layout Process
- Precision is Even More Key: Indoor courts are often used for official games. So,
official basketball court diagramaccuracy is even more critical. - Lighting: Gyms have good lighting. This helps you see your lines clearly as you work.
- No Drainage Concerns: You do not have to worry about water drainage.
Common Mistakes to Avoid
Knowing what can go wrong helps you do a better job.
- Not Cleaning Enough: Dirt under paint will make it peel. Clean, clean, clean!
- Painting on Wet Surface: Paint will not stick to wet ground. Wait until it is fully dry.
- Skipping the Test Strip: Always test your striper and paint on a scrap piece.
- Not Taping Well: Loose tape means messy lines. Press it down very firmly.
- Pulling Tape Too Early or Late: Bad timing makes edges ragged. Find the sweet spot.
- Ignoring Dimensions: Do not guess the
basketball court dimensions. Measure everything. - Using Wrong Paint: Outdoor paint won’t last indoors. Indoor paint won’t last outdoors. Pick the right type.
- Rushing the Job: Painting lines needs patience. Take your time on each step.
Painting basketball court lines is a big project. But with good tools, careful planning, and patience, you can create a great playing space. Your new court will be ready for many games to come.
Frequently Asked Questions (FAQ)
Q: How wide should basketball court lines be?
A: Most basketball court lines are 2 inches wide.
Q: Can I use regular house paint for outdoor basketball court lines?
A: No, regular house paint is not strong enough. It will not stand up to weather or foot traffic. Use special court line marking paint.
Q: What is the most important measurement for a basketball court?
A: All basketball court dimensions are important. But the overall length (94 feet) and width (50 feet) are the base for everything else.
Q: Do I need a sports court line striper or can I just use a brush?
A: A sports court line striper makes lines much straighter and faster. It is highly recommended. A brush can be used for small curves or touch-ups, but not for long lines.
Q: How long does acrylic line marking paint take to dry?
A: Acrylic line marking paint often dries to the touch in 1-2 hours. But it needs 24-72 hours to fully harden (cure). Check the paint can for exact times.
Q: What’s the basketball court foul line dimensions measurement?
A: The foul line is 15 feet from the front of the backboard (or the baseline).
Q: What if my concrete court line painting surface has many cracks?
A: You should fill all cracks before painting. Use a concrete repair product. If cracks are very big, you might need help from a pro. Paint will not hide cracks. It will also wear out fast over them.
Q: How often should I repaint outdoor basketball court lines?
A: This depends on how much the court is used and the weather. Lines on an outdoor basketball court might need repainting every 3-5 years. Indoor lines painted under a clear finish can last much longer.